Secure Authentication with JWT and Two-factor authentication in Angular & Node.js


In this article, our main focus will be on creating Angular authentication using JWT Tokens and 2FA. We'll use Angular for the client-side and Node.js for the server-side implementation.
First, let's create a new app with initial routing configuration
ng new ng-auth-app --style=scss --routing
Next, generate the Login component ng g c components/login
Let's add logic to the Login component
export class LoginComponent {
  loginForm!: FormGroup;

  constructor(private formBuilder: FormBuilder) {}

  ngOnInit() {
    this.loginForm = this.formBuilder.group({
      username: ['', Validators.required],
      password: ['', Validators.required],
    });
  }

  onSubmit() {
    console.log(this.loginForm.value);
  }
}
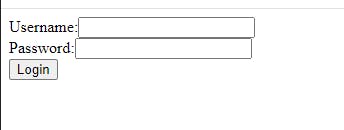
<form [formGroup]="loginForm" (ngSubmit)="onSubmit()">
  <div>
    <label for="username">Username:</label>
    <input id="username" formControlName="username" type="text" />
    <div
      *ngIf="
        loginForm.controls['username'].touched &&
        loginForm.controls['username'].errors
      "
    ></div>
  </div>
  <div>
    <label for="password">Password:</label>
    <input id="password" formControlName="password" type="password" />
    <div
      *ngIf="
        loginForm.controls['username'].touched &&
        loginForm.controls['password'].errors
      "
    ></div>
  </div>
  <button type="submit">Login</button>
</form>
and run ng serve -o
Also, we'll apply styling to our form
form {
  display: flex;
  flex-direction: column;
  width: 300px;
  margin: 0 auto;
}

input {
  margin-bottom: 10px;
  padding: 10px;
  border-radius: 5px;
  border: 1px solid #ccc;
}

button {
  padding: 10px;
  border-radius: 5px;
  border: none;
  background-color: #007bff;
  color: white;
  cursor: pointer;
}
and save the changes:

Now let's create our service for login
export class LoginService {
  private apiUrl = environment.apiUrl;

  constructor(private http: HttpClient) {}

  login(user: { username: string; password: string }) {
    return this.http.post<LoginResponse>(`${this.apiUrl}/login`, {
      username: user.username,
      password: user.password,
    });
  }
}
and change Submit method in LoginComponent
this.loginService.login(this.loginForm.value).subscribe((res: LoginResponse) => {
      if (res.code === 200) {
        localStorage.setItem('token', res.token);
        this.router.navigate(['/success']);
      } else {
        console.error(res.message);
      }
    });
It's time to proceed with the server-side implementation. Let's create a new file named server.js and add code
const express = require("express");
const bodyParser = require("body-parser");
const cors = require("cors");
const jwt = require("jsonwebtoken");
require("dotenv").config();

const app = express();
const cookieParser = require("cookie-parser");
app.use(cookieParser());
app.use(cors());
app.use(bodyParser.json());

app.post("/login", (req, res) => {
  const { username, password } = req.body;
  if (username === "admin" && password === "admin") {
    const token = jwt.sign({ username }, process.env.JWT_SECRET, {
      expiresIn: "1h",
    });
    res.json({ code: 200, message: "Login successful", token });
  } else {
    res.json({ code: 401, message: "Invalid username or password" });
  }
});

app.listen(3000, () => console.log("Server is running on port 3000"));
To generate a JWT token, you need to install the jsonwebtoken package
npm install jsonwebtoken and npm install cors to enable CORS. It's also good practice to create a .env file (a configuration file where we can store environment-specific variables) and store our JWT_SECRET there.
JWT_SECRET=your_secret_key
After a successful login attempt, we'll be routed to the Success component and receive the token

Although storing JWT tokens in local storage can be risky and it's recommended to use HttpOnly cookies for token storage, for the purpose of our learning exercise, we'll proceed with this approach.
Now it's time to add two-factor authentication for our loginComponent. We'll use 2FA with SMS using Twilio.
First we need to install twilio npm install twilio and store the data from twilio account in our .env file
JWT_SECRET=your_secret_key
TWILIO_ACCOUNT_SID=your_twilio_account_sid
TWILIO_AUTH_TOKEN=your_twilio_aut_toke
TWILIO_PHONE_NUMBER=your_phone_number
These variables can be accessed in our code using process.env.VARIABLE_NAME
Next, we initialize the Twilio client using our account SID and authentication
const client = require('twilio')(process.env.TWILIO_ACCOUNT_SID, process.env.TWILIO_AUTH_TOKEN);
create the POST request that sends sms message
server.post('/send-sms', (req, res) => {
  const { phoneNumber, message } = req.body;

  client.messages
    .create({
      body: message,
      from: process.env.TWILIO_PHONE_NUMBER,
      to: phoneNumber,
    })
    .then((message) => res.status(200).json({ message: 'SMS sent successfully' }))
    .catch((err) => res.status(500).json({ error: err.message }));
});
and additionally, we need to create a method send2FACodeSMS in our service
private send2FACodeSMS(code: number) {
    const phoneNumber = environment.phoneNumber;
    const message = `Your 2FA code is ${code}`;

    this.http.post(`${this.apiUrl}/send-sms`, { phoneNumber, message }).subscribe();
  }
and call it in the tap operator in our login method for cleaner code
login(user: { username: string; password: string }) {
    return this.http.post<LoginResponse>(`${this.apiUrl}/login`, user).pipe(
      tap((res) => {
        this.send2FACodeSMS(res.code);
      })
    )
  }
The final step involves adding verification handling in the LoginComponent to ensure a secure login process.
onSubmit() {
    this.loginService
      .login(this.loginForm.value)
      .subscribe((res: LoginResponse) => {
        if (res && res.token) {
          // Store the token temporarily
          localStorage.setItem('tempToken', res.token);
          // Prompt the user to enter the 2FA code
          const code = Number(window.prompt('Please enter your 2FA code'));
          // Verify the 2FA code
          if (code === res.twoFAcode) {
            localStorage.setItem('token', res.token);
            this.router.navigate(['/success']);
          } else {
            localStorage.removeItem('tempToken');
            alert('Invalid 2FA code. Please try again.');
          }So, now after login attemp we will be asked about the code that is sent to defined phone number
        }
      });
  }
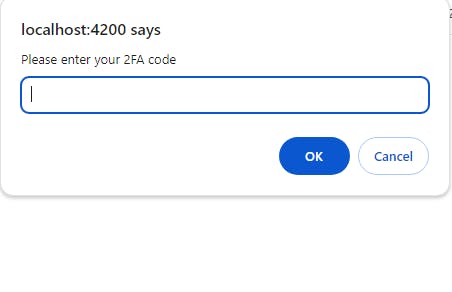
After attempting to log in, we will be prompted to enter the code sent to our registered phone number
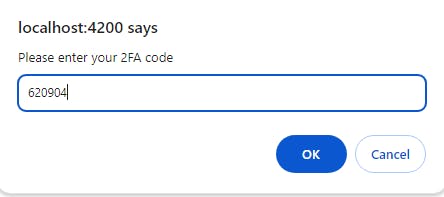
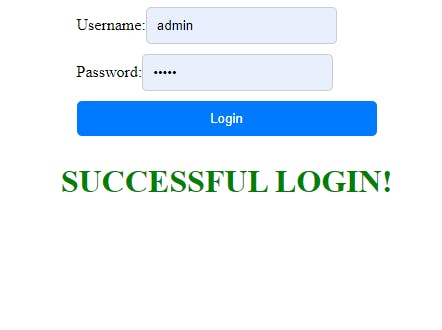
Once entered, we'll be successfully logged in 🙂
One more thing remains to be done. Storing tokens in localStorage is not the best idea due to potential security risks, so we will change our app to store the token in HTTP-only cookies. In our POST request when user logs in successfully, we should set a cookie with the JWT token
res.cookie("token", token, { httpOnly: true });
In LoginService we need to make sure that our HTTP requests include credentials so that cookies can be sent and received
login(user: { username: string; password: string }) {
    return this.http
      .post<LoginResponse>(`${this.apiUrl}/login`, user, {withCredentials: true})
      .pipe(
        tap((res) => {
          this.send2FACodeSMS(res.twoFAcode);
        })
      );
  }
And finally, in our LoginComponent, we no longer need to manually store the token in local storage because the browser will automatically send the cookie with each request
this.loginService
      .login(this.loginForm.value)
      .subscribe((res: LoginResponse) => {
        if (res && res.token) {
          //localStorage.setItem('tempToken', res.token); // Remove this line
          // Prompt the user to enter the 2FA code
          const code = Number(window.prompt('Please enter your 2FA code'));

          // Verify the 2FA code
          if (code === res.twoFAcode) {
            //localStorage.setItem('token', res.token); // Remove this line
            this.router.navigate(['/success']);
          } else {
            //localStorage.removeItem('tempToken');  // Remove this line
            alert('Invalid 2FA code. Please try again.');
          }
        }
      });
And with that, we're all set 👍
In summary, combining JWT and Two-factor authentication provides solid security measures, ensuring a safe and reliable authentication process.